Quantcast
Channel: Handmade Jane
Viewing all 298 articles
Browse latest View live

Liberty lawn giveaway winner

$
0
0
Wow! Thank you all so much for your enthusiasm for my Liberty fabric giveaway. It was the most popular giveaway yet, with over 300 entries! Sadly, there can only be one winner and this time round it's…..Nicola Ashman, who wins a metre of Liberty fabric from Sewbox. Congratulations Nicola, an email will be on its way to you shortly.


Thank you to everybody who entered and BIG thanks to Susan at Sewbox for such a generous giveaway. Seeing all those beautiful Liberty fabrics has inspired me to dig out some Tana lawn from my own stash. Hopefully I'll have something to show off soon….

Thanks also for your get well messages, they were much appreciated. I've definitely turned a corner but still sound exactly like Marge Simpson! 


Have a good week. x


Liberty T shirt

$
0
0
When I say T shirt. I mean something that's very wearable and classic in style, with the added bonus that you can just pull it on over your head. I didn't want to make it from traditional T shirt fabric either, I wanted to step it up a notch, so this little number is made from Liberty Tana lawn. 


After a great deal of head scratching and pretending I knew what I was doing (I really didn't), I came up with a basic tee shape that I was happy with. Sadly, I can't give you the magical formula of how it was drafted as it's mostly a mash-up of my bodice block and the Colette Laurel top, with a bit of Simplicity 2154 thrown in for good measure. There are no zips or buttons (hoorah) so it does indeed slip on over your head like a T shirt, but there are also six darts added to give it a bit of shape. Once I'd stopped fiddling about with the pattern pieces, this was a very quick make. The hem and sleeves are simply overlocked and hemmed and the neckline is finished with bias binding (as per the Laurel top instructions).

I bought the fabric during a Liberty shopping trip with Scruffy Badger (Winnie), last summer. We both decided to make Laurel tops from our Liberty lawn (you can see Winnie's here), but she was a bit quicker off the mark than me - nearly a year quicker as it happens! Anyway, after my recent Liberty giveaway I had a mad urge to make something from a Liberty print so out it came. It's only a one metre remnant, but I was still able to get a top with sleeves out of it by folding the selvedges into the centre before cutting. The fabric design shows circles of black and cream flowers with some sort of polka dot action going on in the background. It's a very busy design which comes in handy for hiding all those darts, even I have to look carefully to find them!


I can see it becoming a real all-rounder in my wardrobe as it's such a classic style. It looks good tucked into a denim skirt, or worn loose with slim trousers and wedges.  Ah, a Liberty T shirt, the best of both worlds in my opinion!  x


Lady Skater - Japanese style

$
0
0
I made this Lady Skater dress at Christmas, but totally forgot to blog about it until I saw Jenny's gorgeous top made from the same fabric recently. As it happens, the timing is pretty fortuitous, as it's much more of a spring dress than a winter one.


The fabric I used is the most beautiful double-layered, polka dot double knit (try saying that when you've had a few!) It's from Etsy shop Miss Matatabi. The two layers are fused together at regular intervals like double gauze and it does actually feel a bit like a knit version of double gauze: very soft to the touch and super cosy. I must point out that Miss Matatabi is the most dangerous fabric shop in the world! I clicked over there just now to get a link for the fabric and saw this- an Aran-look knit fabric!! How could I possibly resist?! Answer: I couldn't, so that will be winging its way over to me from Japan soon. 

Anyway, back to the dress… I did my usual bad trick of changing bits of the pattern in order to make them fit onto the fabric available. Luckily for me, knit fabric is very forgiving! The changes I made that were different from my last version were as follows:

-  Cut a size 4 all over (last time I cut a size 5 bodice and size 4 skirt)
-  Reduced width of shoulders slightly 
-  Shortened bodice by 1 inch
-  Took 3 ½ inches from the bottom skirt curve in order to fit onto the fabric
-  Cut sleeves as a lengthened version of the cap sleeve


I was happy with the fit of my first version, but actually the changes I made this time have resulted in a much better fit all round. I'm especially pleased with the shoulders as they were definitely a bit wide. Reducing the curve of the skirt has made it more of a quarter circle than a half circle which I also prefer.
It was super easy to construct - I sewed the whole thing on my overlocker and used a double needle for the neck and sleeve bands and the hem. 

The fabric is reversible so I felt obliged to try and show off the contrast somewhere on the dress. I went with contrasting neckband and sleeve bands. But… with hindsight, I wish I hadn't made the neckband contrasting as it does give a bit of a juvenile feel. It's annoying, but not enough to make me stop wearing it!

Contrast neckband and sleeve bands

View from the inside showing the reversible fabric
What I like about this pattern is that there's a separate bodice and skirt, so the finished dress looks rather like a neat, fitted Emery or Peony dress. The added bonus is that the lack of darts and the fact that it's made from knit fabric means you can whip this beauty up in no time. Even though it's made from a knit fabric, it's actually quite light and swishy to wear, so it's going to get a second lease of life as a spring dress!  Happy Tuesday. x


Jeans and bras: will I ever make my own?

$
0
0
There are some sewing avenues I don't tend to walk down. I've talked before about why I don't sew exercise gear (which is worth a read just for the comments section) and my first attempt at sewing knickers was an outright disaster. Lots of sewing bloggers seem to be making their own bras and/or jeans at the moment though, which got me thinking…

Let's start with jeans. The trouble with jeans is that I've found my ideal RTW pair and I very much doubt I could get a better fit by making my own. As long as they keep making them, I'll keep stockpiling buying them. If I were to make my own, I would definitely use the Ginger pattern which I already have in my stash. The high waisted version B is the exact same shape as my trusted RTW jeans and virtually every single pair I've seen on other blogs seems to be a great fit.


I think these jeans by Reana Louise are my favourites to date, every time I look at them I can feel myself being dragged nearer to the edge of the cliff! So jeans making almost gets a complete no, but let's just say there's a tiny chink in my armour...

What about making my own bras? 

Source

Well that's an easy one. No. Way. Ever. The reason? Well, even after a recent trip to the bra bank (yes, such things actually do exist), to deposit 12 unwanted bras, I still own over 30 bras. What can I say? I love buying bras and can't seem to stop doing it! My epiphany came about 10 years ago when I discovered Bravissimo (no, I have no link with them, though I'd make a mighty fine ambassador if they ever came knocking!) Once I was accurately measured, every bra I've bought from there has been a great fit. I can understand why people would have a go at bra making if they've never managed to track down one that fits properly, but in my case, why would I ever want to make my own? I might be able to save a bit of money on materials - although I'm sure all the paraphernalia soon adds up - but I wouldn't be able to achieve the same level of comfort and fit.  Bra making looks finicky and precise and my lack of patience would be a definite obstacle. I'd also be terrified of the entire thing falling apart whilst I was wearing it. Can you imagine the horror?! In short, I think I can state categorically, I will never make my own bra! 

I buy very few clothes these days (apart from jeans and cardigans), so splashing out on shoes and undies is how I get my retail kicks. I'd like to hang onto that if I can!  Are there any bra-making converts amongst you? Or does it all seem more trouble than it's worth?  Have a good weekend. x


Reasons to be cheerful

$
0
0
Today there are three reasons to be cheerful. First, I've started re-reading Cold Comfort Farm by Stella Gibbons - I'd forgotten what an absolute delight it is. 


Best of all, I've rediscovered Mrs Smiling, one of my favourite ever characters in a book:

"Mrs Smiling's second interest was her collection of brassieres, and her search for a perfect one. She was reputed to have the largest and finest collection of these garments in the world. It was hoped that on her death it would be left to the nation."

Which seems particularly apt in light of my last post!

Second, this month's issue of Love Sewing is out, complete with a baby blanket project written by yours truly!! Look! My name in print!! Yippee!


Third, it's St George's Day here in the UK which means get the bunting out, it's my birthday! Triple hoorah!

I'll be back with a finished dress to crow about as soon as the excitement has died down.  In the meantime, have a wonderful day everyone. x


1950's-style shoulder tie dress

$
0
0


Recognise this fabric? It's the one I chose from the Hemingway Designs collection, which Tracey from Trixie Lixie very kindly sent me to try out last year. I always knew I wanted to use the fabric for a summer dress, hence the delay. Well, summer's on its way and I'm ready and waiting with my new sundress!

Initially, I was going to make a shirt dress, but after seeing this pattern illustration with a similar turquoise print, I decided to make a fifties-inspired sundress with shoulder ties. I also wanted to add a bit of white somewhere as I love how the two colours look together.


To draft the bodice I used my bodice block as a starting point, together with the instructions from Casey's tutorial for a 1950's sundress (part one and part two). The tutorial worked fine for me, but if you are thinking of using it, I'd recommend reading both parts before you start. It isn't until part two that Casey advises you to use a sleeveless bodice block to make the sundress. A bodice block or pattern that's originally drafted with a sleeve (as mine is) will have more curve around the armhole. Luckily, I made a muslin first and eventually worked out why my armholes were so baggy!

Take my word for it, the neckline does lie flat when I don't have my hands on my hips!
I deviated slightly from the tutorial in a couple of areas. I lowered the neckline to slightly dip in the middle - the original straight-across design does look authentically 1950's, but it was cutting into my neck at exactly the wrong place. I also swapped the gathered skirt in the tutorial for an A-line skirt (I used the pattern from the Colette Peony dress). I reduced the A-line shape by about 1.5" at each side and added pleats rather than gathers at the top (as I did with my gingham Peony dress). The result is not as eye catching as a full, gathered skirt, but I made the dress with holidays in mind, so the less skirt to contend with, the better!


The fabric is a lovely quality, medium-weight cotton, which is a good match for a semi-structured dress as it's nice and crisp. The one I chose is Duck Egg Grid, which has now sold out unfortunately, but if you like the distinctive grid design, it does feature in the newest Hemingway Designs collection in some lovely pastel colours. I didn't even attempt to pattern match the grid design as it's so busy, but actually, when you look closely, the pattern is separated into grids by dividing white lines. By absolute FLUKE, the gridlines on the bodice and skirt match up perfectly, with no help from me whatsoever. What are the chances eh?!

Matching gridline! It's the same on the other side of the bodice too.
Making this dress wasn't without its trials and I did struggle a bit trying to draft the bodice. I always feel slightly out of my depth when it comes to drafting anything myself, I much prefer the safety net of ready drafted pattern pieces. I got there in the end though and the result is just what I was hoping for - a pretty, practical sundress with a bit of a nod to 1950's styles. I like the fact that simply adding white bias binding around the armholes results in a pair of splendid shoulder ties, such a lovely detail!


For some reason, I seemed to think that putting my hair in a pony tail and leaning ridiculously forward would show off the shoulder detail. Er no! I've included the photo anyway because it makes me laugh.

Bloody halfwit!
This dress will be perfect for my holidays and for all those hot, sunny days which I'm reliably informed are just around the corner!  x


Fabric was given to me free of charge for review. All views my own.


Finished: Arielle Skirt

$
0
0

As is often the case, not one but two of my favourite handmade skirts have had to be retired due to being thoroughly worn out. They were my beloved denim Ginger skirt and my navy-with-red-buttons Beignet. Both were made using Colette patterns during my first year of sewing and have been on constant rotation ever since, so they were well and truly worn to death. I needed to make replacements, and fast!


The shape and style of the Tilly and the Buttons Arielle Skirt seemed to be the perfect solution. And as there was now a denim-skirt-shaped hole in my wardrobe, I decided to make my version in denim. The fitted silhouette and cute button detail of the pattern also reminded me of my Beignet skirt, so I felt like I was channelling my two old skirts into one new one!


The instructions for the Arielle pattern are very clearIy written, with good, explanatory photos to guide you through the process. Unlike the Beignet pattern, it didn't take very long to sew at all (I made it over the course of two afternoons) and there are very few pattern pieces, especially if you make the unlined version. The side seams are contoured to fit around your waist and hips, making the skirt very close fitting - using a stretch denim was definitely a good move as it really does yank you into place! Size-wise, I made a size 3 and the only adjustment I made was to the length - I took about 10cms from the length of the longer version. I didn't adjust the waist and hips at all and the finished fit is great. I think it's an ideal pattern for a confident beginner to tackle, perhaps as a second skirt project.


The fabric I used is a stretch denim in a very dark blue from Ditto Fabrics. I pre-washed it, but it still feels quite stiff - hopefully it will soften up after a few washes. Because of this, the overlapped front edge doesn't lie completely flat, but that's just me nit picking. My version is unlined as that's what I've always done with denim skirts (I think of them a bit like jeans!) I would also normally use a lighter weight fabric for the facings to reduce bulk, especially when sewing with denim. In this case, however, I did actually use denim facings and I think the skirt benefits from the extra support. 


I'd planned to simply overlock the outer edge of the facings, but once I saw this post on finishing a facing with bias binding, I had to give my skirt a polka dot edge. I love how the inside of the skirt looks now, it has such a neat, professional finish.


Talking of polka dots, do you like my buttons?! They were given to me by Kerry a few years ago (I think!) and I couldn't resist adding them. Hopefully, the plain, functional denim stops them looking too twee. 


I have a feeling I'll be wearing the Arielle skirt a lot. It seems to be a good match with every single top half I throw at it (as evidenced by the unusual amount of costume changes in this post!), which I'm  taking as a good sign!  I'm so happy with it - I've ended up with a gorgeous, retro looking skirt that was born to live in my wardrobe.  x


A new coat - but not for me!

$
0
0
I don't need a new coat at the moment, but somebody in this household certainly does…. 


Poor old Raggy was looking more than a little bedraggled a couple of weeks ago. Holes had started to appear and sadly for him, parts of his face were rapidly disintegrating. It was time for yet another new coat.


I gave him half a new face by stretching some plain cotton around the affected area. Then I chain stitched a new terrifying Joker-style smile. Look away if you're easily scared.


This didn't take me long at all and neither did the making of the actual flannel coat, it was sewing the bloody head to the coat that took FOREVER! 


It's not my finest work: his new head is on back to front (the other side of those twiddly bits should be on display from the front) and still looks a bit off centre and cock-eyed to me. It doesn't matter though, Charlie thought his new coat (including nightmare-inducing face) was fab.

Me: "Do you like Raggy's new face Charlie?"
Charlie: "YEEEEEESSSSSSSS" Accompanied by massive grin.

That's all I needed to hear!   x


Moody Blues Giveaway

$
0
0
When it come to fabric choice, you may have noticed that I'm rather fond of the colour blue! It's not my most favourite colour (that would be red), but it's a very close second and I love its differing shades and how fab it looks paired up with white. Which makes today's giveaway especially pertinent, because it's all about BLUE!

Sashiko Bird Navy
Perched Birds
Pomegranate Bird Navy
The new Moody Blues collection by Cloud Nine Fabrics has recently been released and the fabrics look absolutely perfect for either quilting or summer dressmaking. Aren't they just exquisite? They're designed by Geninne, an artist and illustrator living in Sante Fe, New Mexico. 

Blooms White
Cacti White
Dots Navy
"Blue in all its shades has been my favourite color since I was a child and is always prominent in my work. When I dream, I dream in indigos and aqua and rolling hills covered in shibori dyed textiles which are my inspiration for this collection."Geninne, for Cloud 9 Fabrics

Sashiko Tree
Mosaic
All of the fabrics shown above are available as quilting cottons, with the two designs below available as a lighter cotton voile along with Sashiko Bird Navy.

Floral White: voile
Butterflies: voile
If you like the look of this beautiful, new collection then this may just be your lucky day! Dragonfly Fabrics are very generously offering one winner two metres of their choice of fabric from the Moody Blues collection. In addition, they're offering a FQ bundle comprising eight designs from the collection as a runner-up prize.


To enter, just leave a comment on this post telling me which is your favourite design from the Moody Blues Collection. The full collection can be found here. My favourite is definitely Sashiko Bird Navy in voile!  The giveaway is open worldwide and closes at midnight GMT on 17th May. The winners will be chosen at random. Please make sure you leave your email address if it's not linked to your Blogger profile so I can contact you if you're a winner.

But wait, there's more….! Readers of my blog can also claim a10% discount on all purchases from Dragonfly Fabrics. Just enter the code HANDMADE10 when checking out of the site. The 10% discount is valid until 24th May 2015.

A massive thank you to Dragonfly Fabrics for such an awesome giveaway. I really hope these beautiful fabrics have whetted your appetite for summer dressmaking.

Good luck everybody! x


Chequerboard Baby Blanket Tutorial

$
0
0


The idea for a chequerboard blanket came to me when I was pondering what to make for my brand new baby nephew. Initially I planned to make him a quilt, but wanted to retain the lovely fleecy backing you get on a traditional baby blanket. So I used my standard baby blanket tutorial, and adapted it to include a patchwork top. I also bound the edges with bias binding. 


I knew there had to be a simpler method of achieving a chequerboard top than cutting each single square individually, so I set to work experimenting with strips of paper. Not being blessed with a mathematical brain, this working out stage took ages, but I'm pleased to say it works and should save you a bit of time. I even sent the instructions to my novice quilter friend Berni, to see if they made sense to a beginner. This was a wise move as she picked up on a couple of things that needed clarifying, so thanks Berni!


This tutorial was first published in Issue 13 of Love Sewing magazine in April but annoyingly, a couple of the step-by-step photographs were printed in the wrong order. So I'm pleased to post the full tutorial here on the blog, with everything hopefully in the right place. I've tried to be as clear and thorough as I possibly can with the instructions, but as always, if there's anything that doesn't make sense, please do let me know. Have a lovely weekend. x


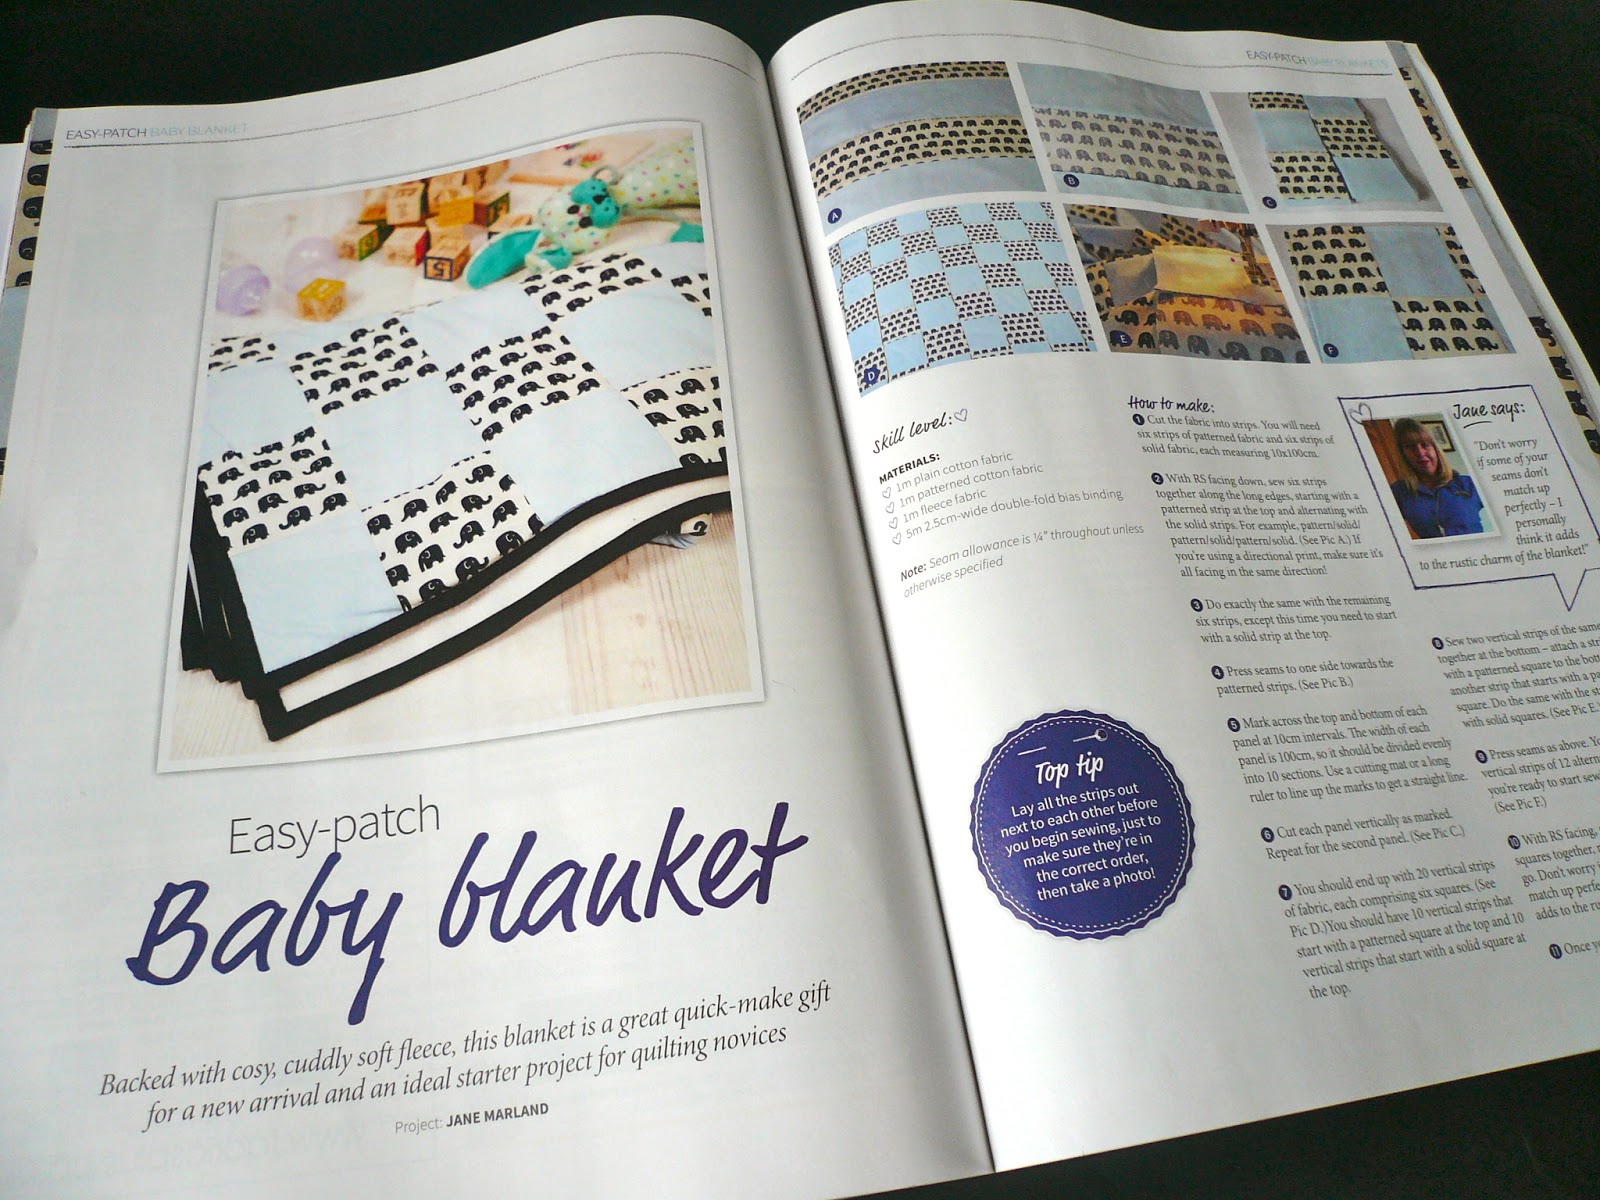
CHEQUERBOARD BABY BLANKET TUTORIAL
You will need:
1 metre plain cotton fabric
1 metre patterned cotton fabric*
1 metre fleece fabric
5 metres double fold bias binding (25mm/1inch wide)

*The adorable elephant fabric I used was from here

Seam allowance is ¼” throughout unless otherwise specified.

1. Cut your fabric into strips:
Six strips of patterned fabric each measuring 10cm x 100cm wide
Six strips of solid fabric each measuring 10cm x 100cm wide


2. Right sides facing, sew six strips together along the long edges, starting with a patterned strip at the top and alternating with the solid strips e.g.pattern/solid/pattern/solid/pattern/solid. If you’re using a directional print, make sure it’s all facing in the same direction!


3. Do exactly the same with the remaining six strips, except this time you need to start with a SOLID strip at the top.

Press seams to one side towards the patterned strips.


4. Mark across the top and bottom of each panel at 10cm intervals. The width of each panel is 100cms so it should be evenly divided into 10. Use a cutting mat or a long ruler to line up the marks to get a straight line.


Cut each panel vertically as marked. Repeat for the second panel.


You should end up with 20 vertical strips of fabric, each comprising six squares. 10 vertical strips should start with a patterned square at the top and 10 should start with a solid square at the top.  


5. Sew two vertical strips of the same sort together at the bottom i.e. attach a strip starting with a patterned square to the bottom of another strip that starts with a patterned square. The rubbish diagrams below illustrate what the two strips should look like when sewn together.


Then do the same with the strips starting with solid squares. Here's what they should look like when sewn together.


6. Press seams as above. You now have 10 vertical strips of 12 alternating squares and you’re ready to start sewing them together!  TIP: lay all the strips out next to each other before you begin sewing, just to make sure they’re in the correct order. Take a photo! 


7. With right sides facing, sew each column of squares together, matching seams as you go. Don’t worry if some of your seams don’t match up perfectly, I personally think it adds to the rustic charm of the blanket!


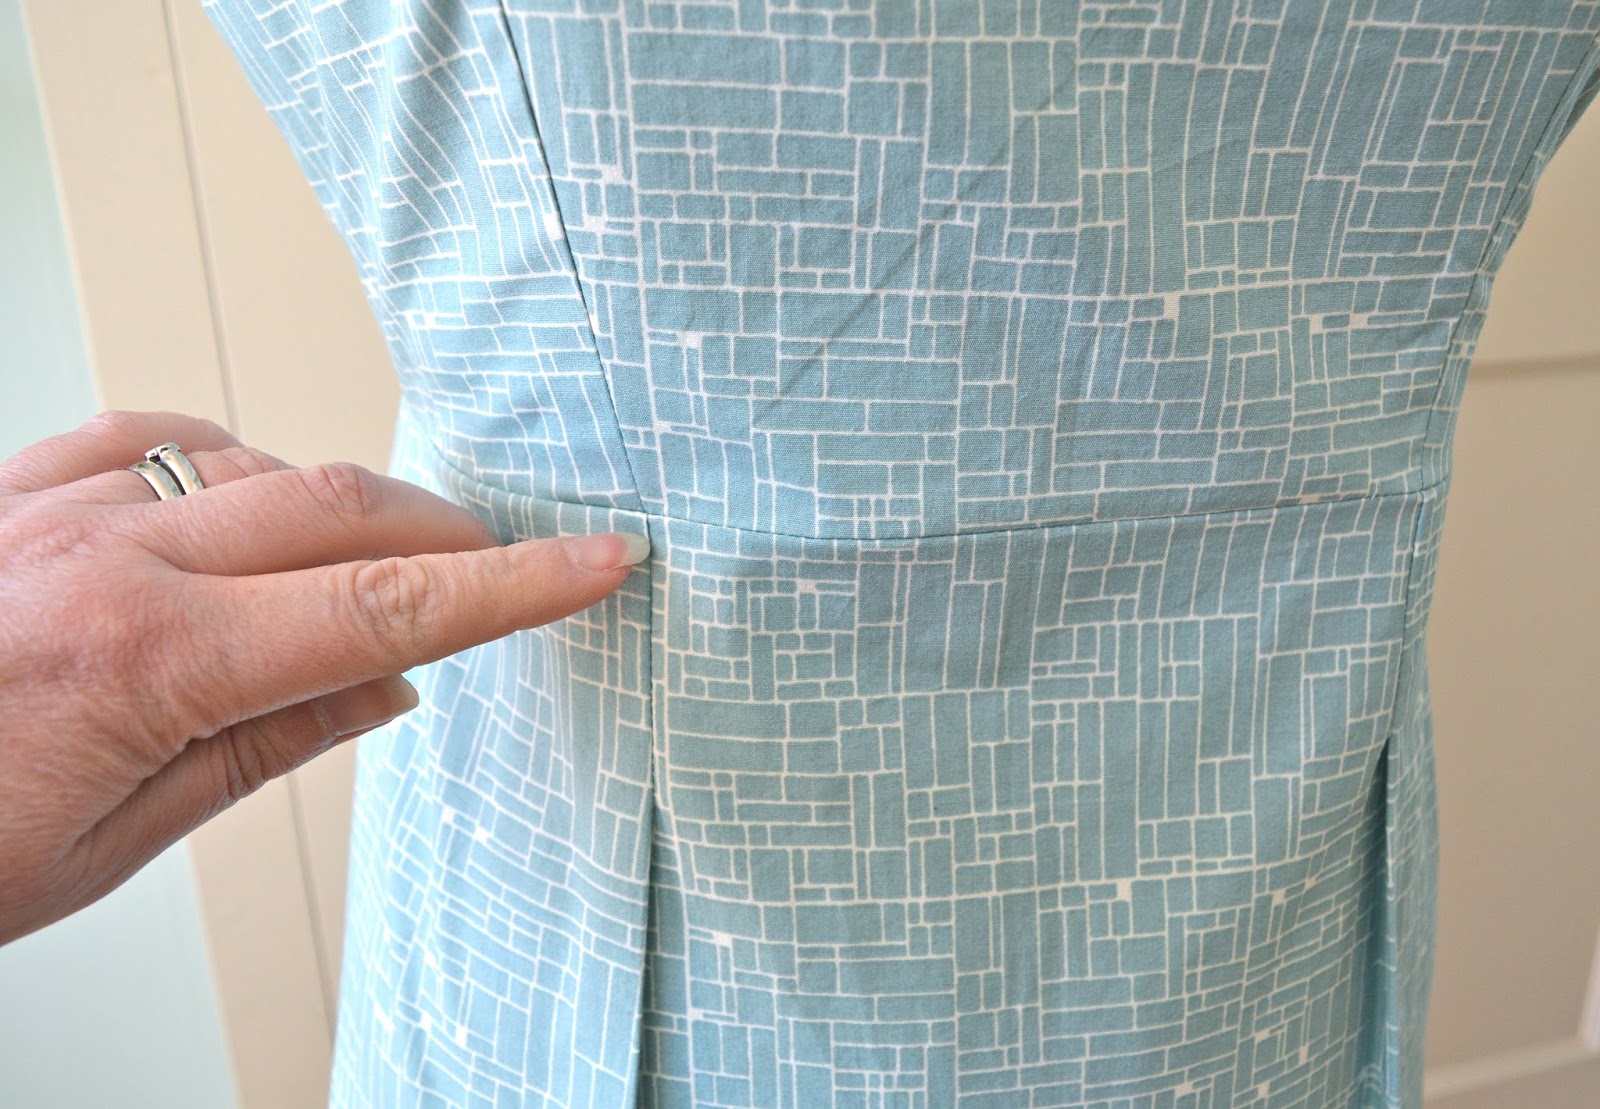
8. Once you’ve sewn the columns, press seam allowances together all in the same direction. Trim any squares that overlap the edges. You now have a patchwork top for your blanket: 10 squares wide x 12 squares long.

9. Cut your fleece fabric to the same size as your patchwork top, it should be roughly 90cm wide x 110cm long. With WRONG sides together, pin both layers together with safety pins, smoothing out the fabric widthways as you go. Use as many pins as you need to – it’s worth spending a bit more time pinning at this stage to ensure the two layers don’t shift around too much. If you have a walking foot, use it now!

Stay stitch around all four edges with a ¼” seam allowance.


Now we just need to bind it. I used 25mm double fold bias binding tape.

10. Open out the binding and pin the raw edge to the edge of the fabric side of the blanket, right sides together. Start about halfway along one of the short edges and pin all the way round, leaving a gap of about 5 inches from where you began pinning.

Sew in place using the fold of the bias binding as your stitching guide.


Here’s what to do for corners:

11. Stop stitching when you’re ¼” from the corner and backstitch (see above).  Fold the binding upwards at a 90 degree angle, then fold back down on top of itself.


12. Make sure the edge of the binding is lined up with the edge of the blanket.

Start sewing right from the top edge of the blanket. Repeat for the other corners.


13. To sew up the gap in the binding, fold the two edges of binding towards each other so they’re edge to edge.


Mark the point where they meet and sew it closed.


14. Press open and trim the binding edges. You can now sew the gap closed as you did for the rest of the binding.


15. Trim the edges of the blanket down and turn the binding round to the reverse side (the fleece side). Pin into place, making sure the binding covers your first set of stitches. 


16. The corners should have a nice mitred edge to them. Sew the binding in place all the way around, as close to the edge as you can. If you prefer you can do this bit by hand using an invisible catch stitch.


Give everything a good press and you’re finished!


Moody Blues Giveaway Winners

$
0
0
Thank you very much to everybody who entered the Moody Blues fabric giveaway. It seems I'm not the only one who likes blue, so I'm thrilled that the giveaway was so popular!

After a quick session with Random.org to select numbers I've just spent ages counting through the comments… then losing my thread and starting again….then losing count again…and again…Anyway, I finally found the two winners and they are…Suzanna Forsythe from Sea Salt and Stitches who wins two metres of Moody Blues fabric of her choice, hoorah, hoorah! 


Runner up is Fiona from Staring at the Sea who wins a FQ bundle comprising eight designs from the collection, wahay!  I've just noticed that both blogs have the word sea in the title - cool!  Please drop me an email ladies and I'll sort out delivery details for your prizes.


Thank you once again to Dragonfly Fabrics for hosting such a generous giveaway. And don't forget, there are still a few days left to use the 10% discount code on all purchases from Dragonfly Fabrics. Just enter the code HANDMADE10 when checking out of the site. The discount code is valid until 24th May 2015. Happy Monday! x

Simplicity 4238 strikes again

$
0
0

This is the fifth version of my favourite vintage pattern (Simplicity 4238) from 1953. It was my chosen pattern for the One Week, One Pattern (OWOP) challenge last year and I'm still not bored of it! There isn't much to add to the construction of this blouse that hasn't been said before as I've got it down to a fine art now! It's a classic, notched collar style with a great 1950's shape, which is down to the cleverly positioned darts and tucks (12 in all). The only pattern change I made was to lower the bust darts by about an inch. 


Let's talk about the fabric instead. I bought this goy-jus double gauze from dangerous-on-the-purse Etsy shop Miss Matatabi last year. Tragically, it's now sold out so I can't give you the link, but what I can tell you is that it's a mid-green polka dot double gauze with a secret lurking on the inside….a gingham reverse side yee-ha! 


Double gauze is a very soft fabric to work with and because of this, the blouse has a more casual feel than some of the others I've made. It probably wasn't the most sensible choice for this pattern as I think a bit of crispness is needed around the collar area. It turned out fine though and it's very wearable so I'm happy. 

Happy!
I didn't use interfacing as double gauze already consists of two layers. This wasn't a problem with the collar, but it was a problem with the buttonhole area. My buttonhole foot was playing up badly (surprise, surprise), so I had the horror of unpicking three half finished buttonholes. Luckily the button band is double thickness and the buttonholes were quite small as I used twitchy buttons, but it still took its toll on the fabric. Therefore my only advice for working with double gauze would be to interface any areas that need a bit of support. Oh yes, and use a fine needle too.


I used self fabric binding on the armholes which is a nice contrast to the internal gingham. In fact I love all the contrasts on the inside! The lightness of the double gauze makes this a fab little addition to my summer wardrobe. I think it will also be good to take on holiday - I can see it pairing up well with my sailor shorts! 


Yet again I seem to have accidentally added another finished item to this year's Vintage Sewing Pattern Pledge. I promise I'll get round to sewing up my actual pledged pattern one of these days. Happy Friday. x


He's at it again...

$
0
0

...he being my friend Joe, and it being tie making! I must admit, apart from making my husband a tie from a basic kit, the ins-and-outs of ties didn't really interest me that much until recently. Joe's enthusiasm is infectious and I'm now becoming strangely fascinated by them!  He came over for a visit a few weeks ago all set to make another tie. Instead of the Sew Over It tie kit that we'd used for his first tie, he now wanted to make a seven fold tie. I'd never even heard of a seven fold tie, so for those of you who are similarly in the dark, here's a quick bit of background:

A seven fold tie refers to how the tie is constructed. Instead of using a separate domette, or interfacing, the tie is made from one single piece of fabric that is folded seven times (the clue's in the name!) There is far more fabric required to make a seven fold tie, resulting in a weightier feel, a superior drape and a more luxurious feel. As a consequence, these ties are very expensive to buy. The extra fabric and body also help achieve larger and more consistent knots. Joe did give me a demonstration of various knots (half Windsor, full Windsor etc) but I'm afraid my mind wandered at that point. 

Anyway, that's what a seven fold tie is, and Joe wanted me to help him make one - I was happy to oblige. He'd come prepared and bought a posh looking tie from a vintage shop to unpick and use as a pattern. The owner assured him it was a seven fold tie, but when we unpicked it, there were only six folds! Apparently there is such a thing as a six fold tie, still luxurious, but one notch down from the seven fold in the tie hierarchy. A six fold is folded in a more symmetrical way than the seven fold (obvs) and includes an interlining. Undeterred, we made a six fold tie instead….


Ironing the tie as flat as we could, we chalked around it to get the shape, including the all-important fold lines. At this point, I think Joe was a bit worried about my slapdash tracing skills, but I was confident that a good press would hide a multitude of sins. For fabric, he used this gorgeous fig design Liberty lawn from their archive collection. Like last time, there was very little sewing involved, most of our time was spent at the ironing board. And my prophecy was correct, pressing really does hide a multitude of sins! He soon had a very posh looking six fold tie. 

The all important label!
For a finishing touch, he wanted to use the same open running stitch and button feature that can be seen on this fab Italian video - how a sette (seven fold) tie is made. I rather like the finished effect, the yellow thread and button really pop against the dark background colour of the tie.


There's no stopping him now, next time we'll definitely be tackling a seven fold tie. Watch this space!

My, what a posh looking tie Mr Alessi

Sew Over It Vintage Shirt Dress

$
0
0

The Vintage Shirt Dress is the latest pattern release from Sew Over It, and one that I said an immediate 'yes' to when asked if I'd like to pattern test it! I was lured in by the vintage details: gathered shoulder seams, cute notched collar, tucks to the bodice and pleats to the skirt. The bodice part is reminiscent of 1930's and 1940's blouses, whilst the fuller skirt reminds me of the 1950's - a lovely combination of styles. The fabric I used is a beautiful blossom print from the Sew Over It shop. Sadly, I don't think the colour I went for (spearmint) is available any longer, but it was a good match for this pattern as it pressed well around the collar and the tucks/pleats are nice and crisp. 

I LOVE the envelope artwork!

There are two pattern variations, with or without sleeves and I chose the sleeveless route. I liked the fact that the cutting line for the sleeveless version is slightly slanted so there's a tiny bit of shoulder on display. One noticeable feature about this dress is that the bodice is designed to be shorter than a typical shirt dress bodice and sits noticeably above the waistline at the front and back. It will appear even shorter if you're large of bust, so I'd recommend measuring the bodice length beforehand to see where it finishes on you. It's also quite generous in the waist, so based on this I made up the size 10 as I wanted a more fitted look. This was a pretty good fit everywhere except for the bust, so I added a one inch FBA (Full Bust Adjustment), plus an extra inch in length to the front bodice and ¼" to the back bodice. The only other fitting change I made was to shorten the skirt by an inch.

I like the final fit a lot, in fact I'm tempted to use the bodice pattern as a starting point for my 1930's-style crepe de chine blouse, using the sleeved version.


The dress construction was straight forward and I was impressed by the clarity of the instructions. The area that often gives me grief when sewing shirt dresses is attaching the collar/facing. I've made the McCall's 4769 shirt dress twice now (here and here) and was actually moved to write a tutorial for the collar section because of the shockingly bad instructions. With this in mind, I scrutinised the instructions for the collar like a hawk and I have to say, they didn't disappoint! Apparently a lot of work went into making this section as clear and well explained as possible - and I think it shows. The only part of the collar I'm not entirely happy with is my choice of interfacing - it wasn't quite lightweight enough, so the finished collar is a bit stiff.


One final thing I did was to add an additional button just below the waistband. The instructions clearly state the importance of positioning buttons at your bust point and above the waist, which I did, but after a few wears, it was clear there was a bit of gaping that needed to be kept in check.

Mind the Gap! 
This isn't specific to this pattern, it's something I've noticed with all the shirt dresses I've made. Wearing a belt is usually a good solution, but I think in future, I'll just add an extra button underneath the waistband as standard. It's not symmetrical but that doesn't bother me, it provides a welcome bit of security when I'm stuffing my face so I'm calling it a design feature!

Shirt dresses aren't the quickest of garments to sew (once you've attached the collar you're then faced with all those buttons and buttonholes!), but I still find them satisfying to make. I like the fact that you get a complete outfit in one go, and in this case, one with such lovely vintage details. This is a great dress for summer that's already seen a lot of wear. I wore it with a cardigan and wedges to the Fashion on the Ration exhibition at the Imperial War Museum recently and felt very suitably attired!


If you like the look of the Vintage Shirt Dress then I have a copy of the pattern up for grabs. To enter, simply leave a comment on this post (don't forget to include your email address if it's not linked to your Blogger profile). The giveaway is open worldwide and closes at midnight GMT on Sunday 7th June. If you're not the lucky winner, then don't panic, Sew Over It are also offering 20% off the pattern for readers of this blog for the next week. Just input the code JANE20VSD at the checkout in their online shop. The discount code expires at midnight on Wednesday 10th June.  Have a good week! x


Fabric and pattern were given to me free of charge for pattern testing. All views my own.


Vintage Shirt Dress giveaway winner

$
0
0
Good afternoon! I've done a bit of randomising and counting and I'm delighted to announce that the winner of my Vintage Shirt Dress giveaway is Mary from Idle Fancy!!! Mary is queen of shirt dresses so how wonderful is that?! Please email me your address Mary and I'll make sure a copy of the Vintage Shirt Dress pattern heads across the pond to you as soon as possible.


Thank you so much to everybody else who entered the giveaway and for all your lovely comments about the pattern. Don't forget, you still have a few days to take advantage of the 20% discount offer - just input the code JANE20VSD at the checkout in the Sew Over It online shop. The discount code expires at midnight on Wednesday 10th June. x


Open House with Mark Powell

$
0
0
Just a quick interlude to tell you about the open house event I went to last week with my friend Clare. It was part of SohoCreate - a five day festival showcasing the creative talents who live and work in London's Soho. Open Houses are a great opportunity to meet the people behind the names, hear how their creative businesses work and generally have a good nose around!

We went to hear bespoke tailor Mark Powell talk about the world of suits. His suits are amazing - they have a classically tailored look (they wouldn't look out of place in a 1940's gangster film), yet there's something sharp and contemporary about them too. I loved them.


He explained how the same suit jacket block can give two totally different looking suits just by fiddling with the details. For example, he added a velvet collar to one jacket (sorry, no picture) and made another one up in denim. You'd never believe they were the same design! 

Double breasted denim suit

Look at the detail on that shirt collar!
One interesting snippet I found out was the cost difference between a ready to wear suit, a made to measure suit and a bespoke suit. A ready to wear suit from his shop costs around £1000, made to measure suits (based on the RTW styles but made up in your exact measurements) cost between £1400-£1800 and a bespoke suit (made from scratch exactly how you want it) starts at £3000. Seeing the beautiful fabrics and linings he uses and the immaculate tailoring up close, I know I'd be tempted to save up for one if I was a suit wearing gent. 

It was also great fun hearing him reel off his opinion of various Savile row tailors, "x is alright, y is probably the best cutter on Savile Row, z is a fucking idiot!" Mark Powell is a larger than life character and I could have listened to him talking all day. Sadly we only had an hour, but I did get to see some seriously smart suits!


Book Review: Sew Over It Vintage

$
0
0

Sew Over It Vintage is the second book by Lisa Comfort (of Sew Over It sewing classes and patterns fame), this time focusing on vintage style. I found it refreshing that Lisa doesn't promise you a head-to-toe vintage wardrobe once you've read it. What she does do is to take inspiration from vintage fashions and styles of the past and mix them up with modern elements to avoid looking too costumey. This pretty much sums up my own approach to using vintage style in my wardrobe so I knew I'd get on well with this book!

It's divided into four different sections:

- Dabble with a bit of vintage - for those who want to add a bit of vintage flair to existing items. 

Adding a Peter Pan collar to a neckline 
Adding fur cuffs and collar to a coat

- Make a vintage inspired wardrobe - this was the section I was really interested in!

- A little something to go with it - how to make your own vintage accessories

- Vintage Home

The 30 projects in the book are clearly labelled with a skill level and there are plenty of quick, easy fixes for those new to sewing, particularly in the Embellishing and Vintage Home sections. For me though, it was the second section (make your own vintage wardrobe) that was the most interesting part of the book and what I'll be focusing on in this review.

You do need to have a bit of sewing experience before tackling the dressmaking projects. The reason for this is because there are no patterns included with the book - they're all made from blocks which you draft yourself based on your own measurements. I promise you, this is not as scary as it sounds - I'm a complete thickie when it comes to anything involving maths and measuring, but even managed to draft a bodice block without incident. Yes, they take a bit of time to create, but they're not difficult. There's a well explained section on measuring yourself properly (you'll need a friend/partner to take some of the measurements) and the steps are very comprehensive and detailed.


The book includes ten garment projects, all made using either the bodice block or by drafting a skirt section. Lisa then shows you how to adapt the basic blocks to create the different garment designs. Influences for the designs range from the 1920's to the 1960's:

A chic, 1920's-inspired Anita Tie Top for pairing with jeans.


A lovely, tie-necked 1950's sailor blouse with a simplified collar. 


A Betty Draper-inspired box-pleat skirt. The example in the book is made from crepe which gives it a softer look- I'm keen to make one with a more structured feel. 


A cute, 1960's-inspired pleated dress. This project uses an existing fitted top as a starting point, then shows you how to draft the skirt to attach to it. Such a pretty result!


One thing to note is that the bodice block is not supposed to be close fitting - the projects that use it all have quite a lot of ease built in. This simplifies the process and eliminates the need for darts and closures. So if you like your top half to be fitted to within an inch of its life, then the dressmaking projects probably won't be to your taste. To be honest, I like my top half to be super fitted too, so I was surprised when my attention kept being drawn to the chic, 1920's inspired, unstructured Anita Tie Top!  Eventually I caved in and drafted one for myself. Yes, you read that correctly, I drafted one for myself!!! Despite my scepticism about the relaxed fit, it's a winner and I've already worn it out twice! I changed a couple of things about it, so I think it deserves its own separate post, but here's a sneaky peek of the finished top….


…and one of me wearing it. It's self drafted don't you know!


If you're familiar with using commercial patterns, but would like a bit of hand holding before moving onto pattern cutting in more detail then I can't recommend this book highly enough. I certainly got a lot out of it and already have plans for a self-drafted pleated skirt.  x


Sew Over It Vintage was given to me free of charge for review by Love Sewing Magazine, all views my own. You can find out what other sewing bloggers thought of the book here:

A Stitching Odyssey
Did You Make That?
House of Pinheiro
What Katie Sews


Boy genius sews a waistcoat

$
0
0
Disclaimer: This blog post is 100% biased.


Every parent thinks their children are uncommonly wonderful and talented, but when your child does something awesome AND sewing related, then there's no choice but to splash it all over the blog!  This year, in his Textiles class, my son Louis made a waistcoat from scratch. Now, before I start waxing lyrical about his sewing super powers, let's just marvel at the fact that a boy studying textiles is a normal part of the syllabus in an ordinary London High School. When I was at school (thousands of years ago, admittedly), Textiles was known as Needlework and was exclusively for girls, it didn't cross anybody's mind to teach the boys. How refreshing that things are different these days. Anyway, back to the child genius….

A bit loose fitting, but he's a skinny lad.


Getting accurate sewing details from a 13 year old boy is a bit like getting blood from a stone, but from what I can gather, they took measurements in class and worked from a pattern that the teacher provided. The outer fabric of the waistcoat is a navy wool mix and it's fully lined with burgundy lining fabric. 


And if that's not impressive enough, it has three buttonholes and a welt pocket! A WELT POCKET at age 13!!! 

Must remind him to use matching thread on his next attempt!

The young are so fearless, apparently they had a choice of making a welt or patch pocket and he went for the welt option because it was more difficult. To this day I still haven't made a welt pocket, so he's overtaken me already in his sewing bravery!


Yes, there are a few tiny flaws…. there's a singe mark on the inside lining where he'd been let loose with an iron, and the three buttons fell off the minute I buttoned them up! Apart from that it's perfect and he's a genius.


To say I'm proud is a slight understatement - I whip out the waistcoat for unsuspecting visitors to admire at every opportunity. And to any Savile Row tailors who might be interested in my boy's sewing skills, please form an orderly queue! x


Anita Tie Top

$
0
0
For those of you who are interested, I thought I'd give a bit more detail about the Anita Tie Top I made recently. I drafted it myself using the bodice block from Sew Over It Vintage (review here).


You can see from the diagram below that the original block is slightly shaped at the waist, (line H/I/E). For the Anita top, all you do is square the side seams off for a looser fit (line H to M). As I wanted a slightly more fitted look, I kept the original shaped waist, then joined point E to point M (M is the hip line). This gives a little bit of shaping, but leaves enough ease to create the gathers around the waist.


My version of the top still turned out looking quite a bit shorter than the example in the book. What happened was that the original bodice block finished noticeably higher than I was expecting (probably because of my bust taking up too much room). I made a mental note to lengthen the block by a couple of inches before I drafted the Anita top, but never actually wrote this down. You can probably guess the rest, the mental note flew straight out of my head, never to return, and I forgot to lengthen it, doh! I think the finished top is fine though, and on me I actually prefer it sitting on my hips instead of lower down - it gives the illusion of longer legs!

Original Anita Tie Top in Sew Over It Vintage
My (inadvertently) shorter version
The one other tiny change I made was the height of the shoulder/kimono sleeve. The pattern calls for a lightweight, drapey fabric and although Tana Lawn has a beautiful, silky hand, it isn't as drapey as a silk or rayon. Consequently, the kimono sleeves looked a bit wing-like at the shoulders. All I had to do to remedy this was to lower the outer edge of the shoulder opening by about an inch, tapering to nothing in the middle of the shoulder.


The front and back pieces are identical so it's a very simple top to sew together. 

For fabric I used a Liberty Lawn (Capel in navy). As Liberty fabric is quite wide, I managed to cut the front, back and bottom band out of the measly half metre I had in my stash. I was thinking I wouldn't bother with the ties, but once I'd made the top, I realised it needed the ties to give it that chic 1920's vibe. There was a hitch though, Capel fabric in navy is either out of print or exceedingly scarce, as I couldn't find any anywhere. In desperation, I sent a begging email to Susan at Sewbox as I knew she stocked a good range of Liberty prints. By an absolute miracle, she happened to have a remnant of  navy Capel print squirrelled away (it wasn't listed on her site). She wouldn't accept any money for it either, she was just happy to help out - sewing folk are so lovely sometimes aren't they?! Once again, THANK YOU Susan!

It's quite difficult to see the tie belt amidst all that floral, but it's essentially sandwiched into the seams at both sides of the bottom band. The tie is then wrapped around at the back and tied at one side.

Bottom band and ties
It's worth noting that the grainline of the ties runs perpendicular to the long edges, which means you need fabric that's at least 1.4m or 55 inches wide. This is especially important if you have a directional print. Liberty fabric is a fraction under 1.4m wide so I just about got away with it.


I'm so pleased that my experiment in pattern drafting resulted in such a lovely, wearable top. There's a gap in my wardrobe for semi-posh tops that can be worn with jeans and this fits the bill perfectly. My next version will be in a solid colour as I suspect this style will look great with a statement necklace.  Have a good weekend! x


Magic button sewing tip - it works!

$
0
0
I first came across this simple tip a couple of weeks ago via Emmie on My Oh So Vintage Life and it's now my favourite sewing tip EVER! It's a trick to eliminate gaping between buttons on shirt dresses, specifically at the waist. This is at its most noticeable when you sit down and invariably end up displaying the two inches of flesh you'd rather never saw the light of day again. 

Emmie's tip is sew an inward facing button in the offending area - the trick is to sew it on the inside of the button band so it's invisible from the front. Gahhh!!! Such a simple tip, but so effective! 

Secret button sewn on the inside of the button band (LHS), with buttonhole on the opposite side
I can also confirm that it works for the dreaded boob gape - as soon as I discovered this tip I put it to the test on my Granville Shirt. I absolutely love this shirt, but thanks to my own slapdash methods of button placement (trying to eyeball them rather than measuring properly), it's always gaped at the bust point. It hasn't stopped me wearing it and it's not actually that noticeable, but it is a pain to keep fiddling and pulling the front of my shirt.

Here I am, helpfully pointing to the offending area….


Here's the BEFORE picture…


And here's the AFTER picture….


Yay, no gaping!


When the shirt is buttoned up, the internal button and buttonhole are completely invisible from the front. Just to remind you, the hidden button is between the second and third button down.


 And here's what it looks like from the inside….


This solution may be blindingly obvious to lots of you, but it certainly wasn't to me, so please indulge me! Sorting out a dreaded waist or bust gape is just so satisfying! Two further shirt dresses have also been given the same treatment at the waist with great results. Thank you Emmie, for showing me the light! 

What were the sewing tips that changed your life? Please share, I'd love to know! x


Viewing all 298 articles
Browse latest View live


Latest Images