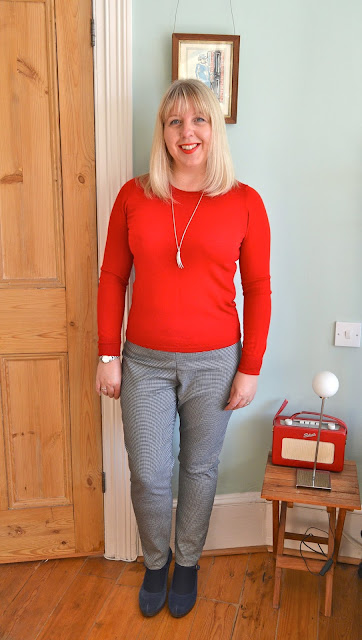
Behold - my first pair of trousers using my trouser block! I made the pattern during a one day trouser fitting course at Ray Stitch last month, but it's taken me a while to get round to making the final adjustments. Nothing too complicated, just tapering in the width of the legs considerably as that's the style I wear most. On a side note, I've come to the reluctant conclusion that as much as I love them, very wide legged trousers really don't do me any favours. I'm short, and however well fitting around the hips and bum they are, wide legged trousers just make me look even shorter. So it's slim legged trousers from now on, preferably teamed with a giant heel!

Having got my trouser block sorted, what I should have done is use a nice, ordinary non-stretch fabric for my first attempt. That would have been the sensible approach. Instead I used a lovely, but extremely stretchy houndstooth poly viscose I bought at Ray Stitch during my course. It has great drape, washes well and barely needs an iron, but frays and unravels like it's going out of fashion. I had to overlock all my edges straight away. It also has about a billion percent stretch in it, in fact there's so much stretch it's almost like a knit fabric. Unsurprisingly, this meant that the trousers came out way too roomy. Undeterred, I painstakingly unpicked them (I know, I'm amazed too!) and recut the pieces with the following changes:
- Removed a 1.5" wedge from the back seam
- Removed a 1" wedge from the front seam
- Made an additional large tuck in the back thigh as there was a lot of excess fabric (this was an adjustment Alice made to my original block too)
They're still not perfect - there's a bit of bagginess in the front crotch - but that was as much fiddling as I was prepared to do and I'm happy to wear the trousers as they are. The ridiculous amount of stretch meant I could almost get away without a zip. Almost, but not quite! The zip is positioned up the back seam as that's how we made our toiles (easier to adjust) and I decided to keep it in that position as I like how it looks.
They're still not perfect - there's a bit of bagginess in the front crotch - but that was as much fiddling as I was prepared to do and I'm happy to wear the trousers as they are. The ridiculous amount of stretch meant I could almost get away without a zip. Almost, but not quite! The zip is positioned up the back seam as that's how we made our toiles (easier to adjust) and I decided to keep it in that position as I like how it looks.
 |
| In the interests of science I've included a back view. |
I was worried that the waist would stretch out over time, so it's finished inside with a simple piece of strong elastic. It works like a waistband facing - I just zig-zagged it to the top edge of the waistband, turned it over then stitched in the ditch at the side seams to keep it in position. I cut the elastic a couple of inches shorter than my waist measurement so it keeps the waist nice and snug!
![]()
I'm pleased that the trouser block actually works! I compared it to what I'd always thought of as a well fitting pair of trousers - the Ultimate Trousers pattern. Amazingly, the crotch curves were completely different, which was interesting. It also reassured me that the course was money well spent!
![]()
I'll have to slightly tweak the block pattern for different fabrics as they're all so changeable. So for my next pair, I'm quite tempted to see how they'll turn out made with a stable denim. I'm unite pleased with how they turned out for a first attempt though. Have a good weekend! x

I'm pleased that the trouser block actually works! I compared it to what I'd always thought of as a well fitting pair of trousers - the Ultimate Trousers pattern. Amazingly, the crotch curves were completely different, which was interesting. It also reassured me that the course was money well spent!
I'll have to slightly tweak the block pattern for different fabrics as they're all so changeable. So for my next pair, I'm quite tempted to see how they'll turn out made with a stable denim. I'm unite pleased with how they turned out for a first attempt though. Have a good weekend! x